Skip to content

Tracking

For more detailed tracking of campaign performance and correct attribution of the sources of target actions, it is recommended to use an analytics system.

Types of macros that AdsGram reveals:

For detailed tracking, use macros. AdsGram will automatically replace them with real data in your tracking link.
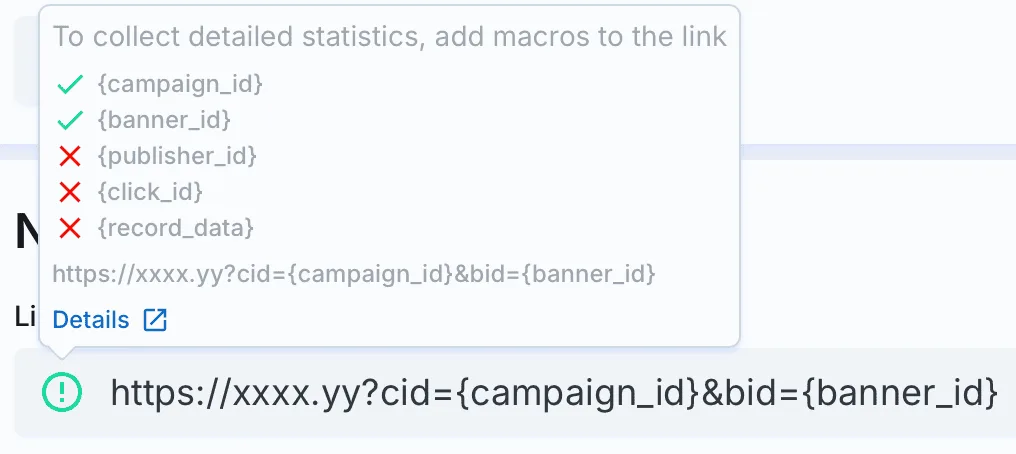
  • {campaign_id}
  • {banner_id}
  • {publisher_id}
  • {click_id}
  • {record_data}

WARNING

The {record_data} macro is required for the API to operate. Conversion tracking will fail without it.

IMPORTANT

The macro {publisher_id} is revealed only as a unique publisher identifier — without specifying its name or other identifying information.

Example of campaign URL:

https://your-tracker.com/?campaign={campaign_id}&banner={banner_id}&pub={publisher_id}&clickid={click_id}&record={record_data}

IMPORTANT

If your landing link opens TMA via the start parameter, use the following link, for example:

https://t.me/[name_of_the_bot]?start=[unique_referral_link]_{campaign_id}_{banner_id}_{publisher_id}_{click_id}_{record_data}

The dashboard highlights the macros added to the link Added macros and the ones that are missing Missed macros.

Selected macroses

API for conversion confirmation

For custom analytics systems or direct server integration, use the API.

The API endpoint is a special URL where your server issues a request immediately when a user conversion event is recorded. This allows AdsGram to receive real-time data on campaign results.

Endpoint:

https://api.adsgram.ai/confirm_conversion

Parametrs:

  • token — a unique token associated with your account, available in the AdsGram cabinet (can be regenerated)

    To obtain the token, go to your profile in the top right corner and click the button Copy. Copy macros

  • record — a unique value for each click or impression, corresponding to the {record_data} parameter automatically inserted by AdsGram into the tracking URL.

  • goaltype — an additional parameter that specifies the type of conversion (funnel stage), helping to segment various user actions. It accepts integer values from 1 to 3.

    goaltype usage:

    1. Define the funnel stages in your product or service.
    2. Map the stages to goaltype values:
        1. Registration
        1. First deposit/purchase
        1. Repeat deposit/purchase
    3. Configure conversion tracking for the relevant stages of the user journey.
    4. Add the goaltype parameter to your API request when sending conversion data.
    5. Use this parameter in your analytics to perform a detailed performance analysis by conversion type.

How to use:

  1. Select an active campaign or create a new one.
  2. Ensure the destination URL includes the {record_data} parameter.
  3. Retrieve your token from the AdsGram cabinet.
  4. Set up server-side logic to send a request to the API when a user completes the target action.
  5. Verify that requests are processed successfully and check for data in your analytics.

Example server request upon conversion:

https://api.adsgram.ai/confirm_conversion?token=YOUR_UNIQUE_TOKEN&record=7f3a1b6c5d2e4f8a

Expected response: 200 OK — successful conversion registration.

Partner integrations

AdsGram is integrated with Adjust and AppMetrica. It is also possible to work with links from other trackers, but in this case, AdsGram will not be able to transfer the necessary information to the tracker for more detailed analytics.

IMPORTANT

Advertisers using Adjust and AppMetrica for their mobile app can now get data on conversions that users have made after clicking on AdsGram advertising banners.

Adjust

1. Choose Network

In the Campaign Lab section, go to Partners

  • Click New Partner.
  • In the search bar, type AdsGram and select this network.
  • After selecting, click Next.

2. Choose the App

On the next screen, choose the app for which you want to create the link. Use the search bar to find your app, or scroll through the list to find it. You can set up links for one app at a time.
After selecting the app, click Next.

3. Set Data Sharing Options

In this section, you will set up the data sharing parameters with AdsGram, selecting which events and app parameters will be sent to AdsGram for analysis.
Detailed instructions are available on the Adjust documentation page.

After configuring all parameters and mappings, you will receive a unique tracking link, which should be used when creating advertising campaigns in AdsGram.
Additionally, you can add extra parameters like UTM tags for more precise tracking of traffic sources.

IMPORTANT

After setting up tracking links, data about user conversions to app installations and in-app events after clicking on AdsGram ads will be displayed only in the Adjust interface.

AppMetrica

Creating a tracker:

  1. After registering in the AppMetrica personal account, integrating the SDK into the app, and setting up target action tracking, you can proceed to create the tracker.
  2. Specify the name of the tracker.
  3. Add the application.

Detailed instructions are available on the AppMetrica documentation page.

Installation data transfer:

  1. Choose the postback recipient (AdsGram).
  2. Specify the event type that needs to be sent to AdsGram.
  3. Obtain the Postback URL — the link through which events and installations will be sent to the AdsGram server.
  4. After creating the postbacks, you will receive a tracking link. This link should be used when creating campaigns in AdsGram. Additionally, you may add extra parameters, such as UTM tags, if needed.

Keitaro

1. Creating a Tracker in Keitaro

  1. After logging in to the Keitaro dashboard, go to the Trackers section.
  2. Click Create tracker or New tracker.
  3. Enter the tracker name and select AdsGram as the traffic source type.
  4. Click Save to create the tracker.

2. Configuring Postback in Keitaro

  1. In the settings of the created tracker, go to the Postback or API Integration section.
  2. In the Postback URL field, enter the AdsGram endpoint:
    https://api.adsgram.ai/confirm_conversion
  3. Add the following required query parameters:
    token=YOUR_UNIQUE_TOKEN&record={record_data}
    where YOUR_UNIQUE_TOKEN is the token from your AdsGram profile.

3. Setting Up a Campaign in AdsGram

  1. Copy the Click URL from your Keitaro tracker settings (for example: https://your-keitaro-domain.com/click.php?campaign_id={campaign_id}&subid={click_id}).
  2. In the AdsGram dashboard, when creating a campaign, paste this link into the Click URL field.
  3. Add the required AdsGram macros to the link:
    https://your-keitaro-domain.com/click.php?campaign_id={campaign_id}&subid={click_id}&publisher={publisher_id}&banner={banner_id}&record={record_data}
  4. Make sure the {record_data} macro is included in the final link.

4. Setting Up Goals in Keitaro

  1. In your Keitaro tracker settings, go to the Goals or Conversions section.
  2. Create a new goal or select an existing one.
  3. Enable postback sending to the previously specified URL for this goal.
  4. Define the trigger conditions (e.g., upon conversion confirmation or specific status).

Kochava

1. Creating a Tracker in Kochava

  1. After logging into the Kochava dashboard, go to the Apps & Assets section.
  2. Click Add New and select App to create a new application tracker.
  3. Fill in the required fields:
    • Platform: Choose the application platform (iOS, Android, Web).
    • App Name: Enter your app’s name.
    • Store ID: Enter the app’s store identifier (App Store ID, Package Name, etc.).
  4. Click Save to create the application.

2. Setting Up Partner Integration

  1. In the created app’s page, navigate to the Partner Management section.
  2. Click Add Partner.
  3. Find and select AdsGram from the list of partners.
  4. Click Next to proceed to the configuration settings.

3. Configuring Integration Parameters

  1. In the Integration Settings section, select the tracking type (Click-Through, View-Through, or Hybrid).

  2. Enable the Server-to-Server Postbacks option.

  3. In the Postback URL field, enter the AdsGram endpoint:

    https://api.adsgram.ai/confirm_conversion
  4. Add the following parameters to Postback Parameters:

    • Required parameter: {record_data} (automatically inserted by Kochava).
    • Add parameter: token with the value YOUR_UNIQUE_TOKEN (taken from your AdsGram profile).
  5. Set up data mapping macros:

    • {campaign_id} → campaign_id
    • {click_id} → click_id
    • {publisher_id} → publisher_id

4. Setting Up a Campaign in AdsGram

  1. Return to the Tracking Links section in Kochava and create a tracking link (for example: https://your-app.kochava.com/install?data={encrypted_data}).
  2. In the AdsGram dashboard, when creating a campaign, paste this link into the Click URL field.
  3. Add mandatory AdsGram macros to the link as parameters:
    https://your-app.kochava.com/install?data={encrypted_data}&campaign_id={campaign_id}&click_id={click_id}&publisher_id={publisher_id}&record={record_data}
  4. Make sure the {record_data} macro is included in the final URL.

5. Configuring Events in Kochava

  1. In the Kochava dashboard, go to the Events section.
  2. Create a new event or choose a standard one (for example, install, purchase).
  3. Configure the postback for the selected event:
    • Enable Send Postback.
    • Select the previously created AdsGram integration.
    • Define filters and trigger conditions.
  4. Save the event configuration.

6. Testing the Integration

  1. Use Test Mode in Kochava to verify install tracking.
  2. Check incoming requests in the Kochava and AdsGram logs.
  3. Ensure that the record_data parameter is being passed correctly.